
How To Paint Cabinets Without Sanding
I love painting cabinets . . . well, I love the result of painting cabinets. The act of painting really isn’t bad either, but I HATE sanding the cabinets beforehand. It’s a lot of work, but I’ve always done it (or used a chemical deglosser) because I thought it was the only way to make sure that the finish adhered to the cabinets. I’m not about taking shortcuts if it means that the end product isn’t durable, quality work. In prepping our rental property though, I decided to finally try a no-sanding approach to the generic oak kitchen cabinets and I was so thrilled with the results.

Before, the ugly oak cabinets made the room feel dark and bland. After, the light gray blends well with the plank backsplash and buttercream countertops.
The oak cabinets in our rental house originally looked cheap and generic, and they also brought out the ugly yellow hue of the countertops. We didn’t really have enough money to replace either the cabinets or the counters, but I was convinced that something had to change before we listed the property. Luckily, I found a light gray semigloss paint in the discount section of Lowes for only $9.00 and I knew it would be a perfect color. I wanted to downplay the counter and match the dark grey plank backsplash that I was also installing. The color really pulled it all together and was such an economical solution to totally transform the kitchen.
If you are planning to paint your cabinets, you can choose any high-quality semi-gloss paint. You want semi-gloss or gloss to make sure that you can easily clean and wipe down the cabinets as they get dirty with the normal kitchen grime and grease. You will also need the secret weapon for painting without sanding: Zinsser’s BIN Primer. This stuff really sticks to just about everything and it dries in the blink of an eye (okay, more like 30 minutes). It is a shellac so it will totally encase the original surface and allow you to create a perfect foundation for your semigloss topcoats.
Prepping the Cabinets
Even though you don’t have to sand or degloss the original finish, it is still extremely important to clean and degrease the cabinets before painting. I used a 1-2 step of Pine Sol cleanser and Mean Green degreaser. I scrubbed the cabinets with warm Pine-Sol. I then sprayed the cabinets with the Mean Green and wiped them off with paper towels. If you feel any residue after these two steps, try scrubbing with Pine Sol again. After you have finished cleaning, let the cabinets completely dry before you start painting.

Use a good cleanser like Pine Sol and a degreaser to make sure the paint will adhere directly to the cabinets.
You also need to remove the cabinet doors and drawers to make it easier to paint. I started removing them with a screwdriver but quickly switched to a drill, which made the process go much more quickly. I also left the hinges and hardware inside the cabinets so I wouldn’t lose them. Then, all you have to do is lay all of the doors and drawers out on a drop cloth, and you’re ready to paint.

Remove doors and all hardware before painting.
Priming Cabinets the Right Way
As with most painting projects, the secret to getting a beautiful finish is to use many light coats, and I prefer to use a weenie roller for most of the painting on cabinets. You will also need to use Zinsser’s BIN primer as your first two coats to make sure that the paint sticks to the cabinet. BIN primer is extremely thin and very stinky. I was able to avoid a mask this time because I had the windows down and was getting a lot of airflow, but you will most likely need to wear a mask when using this paint. The good news is that BIN primer dries extremely quickly. By the time you get done painting the first coat, you will probably be able to immediately paint the second coat.
Again, you want to paint light, even coats as you prime. You can use a high-quality synthetic or natural bristle brush to cut in on trim, but try to feather the paint so that you don’t leave brush marks. Use a weenie roller for the majority of the painting to ensure a professional-looking finish. If you take a painting break, make sure to wrap up the tray in a plastic bag and put it in a cool place (refrigerator if possible) to keep it from drying out. You can also easily clean the brushes and any spills with ammonia (it’s smelly but works like a charm).

Cut in on the trim first and then paint the flat parts with a weenie roller.

The first coat of paint on the cabinet doors.

Try to keep brush strokes light and feathered.

The first finished coat of paint should be semi-transparent.

The second coat of primer should be even, but it may only be 80-90% opaque. As long as there are no drips, you should be ready to add the semigloss topcoat.
After the first coat dries completely, you can start with the second coat. Some people prefer to sand in between coats, but I don’t think you need to as long as you kept the first coat very light and you didn’t have any obvious drips. You can spot-sand dried drips as you see them.
Many people would skip the next step before applying the semigloss, but I think it makes all the difference. If you want a totally pro look, you have to caulk the gaps in the cabinets between the trim and the door. The gaps are what makes the doors look cheap and flimsy. I use DAP ALEX paintable caulk in white. You can run a thin bead down the part where the door and the trim connect. Then, dip your finger in water and run it down the crease, making sure to wipe up any excess caulk that runs off the sides. Let it dry before applying the first coat of semigloss.

Apply a thin line of caulk along the edge of the trim.

Use a wet finger to smooth out the caulk.
Painting the doors is the hardest part of this whole process because you have to paint both sides. I didn’t bother painting the inside of the cabinets because they were in good shape and I think they work better without paint on the inside shelves. The inside of the doors, however, needed to be painted. This means that there was a lot of flipping the doors back and forth to be able to paint them. You might also invest in a painting tripod to hold the doors aloft as you paint. I just placed mine on top of a paint can and it worked well enough this time.

Don’t forget to paint the back of the cabinet doors.
A Professional Look
You don’t need to spend a fortune to makeover your kitchen with paint. My nine-dollar paint worked wonders but even a non-discount can of paint will only run you around $30. When you apply your semigloss, apply it much like the primer. Make sure to use thin, even coats. I don’t even bother to use the brush at this point unless it’s unavoidable. I just stick with the weenie roller to make sure that the finish looks the same across the entire surface. You will need to allow a longer period of time for drying in between coats. I usually would just wait a day before applying another coat but follow the directions on your specific can of paint. If you have a high-quality paint, you can usually get away with only two coats, or maybe two with a few touch-ups in thin spots. Take your time and resist the urge to rush or lay on thick coats because that will create drips and an uneven look.

This discount paint was the perfect shade of gray and only nine dollars!

Paint your cabinets with a weenie roller to create an even finish.

Paint thin coats to avoid drips and streaks.

You can use a weenie roller to apply your semigloss to the trim as well.
After your final coat of semigloss has fully dried, you can put the doors and drawers back. Carefully reattach all of the hinges and hardware. I then go around and lightly apply paint where I can see any areas that may not have been completely covered. I also apply little plastic bumpers on the inside of drawers and doors to keep the painted surfaces from sticking to each other. I found some inexpensive bumper stickers at Big Lots.

After all the coats of semigloss have dried, you can put the doors and drawers back.

You can purchase cabinet protectors at Big Lots for less than five dollars.
Overall, I am so pleased with the finished cabinets. The kitchen is still neutral enough for a renter, but the cabinets have more of a personality than the boring oak cabinets you find in every other rental. I was also incredibly satisfied with Zinsser’s BIN ability to stick to the cabinets without any sanding. It’s hard to know just by looking, but the paint has been extremely durable so far. I am now inspired to paint the cabinets in our house, if I can find the time with school starting up again in a couple of weeks, Argh! Oh well, those cabinets aren’t going anywhere. In the meantime, we are finishing up the final few projects in our rental and will hopefully have a new occupant soon. I hope they love the cabinets as much as I do!

The kitchen has a cute retro look with the gray cabinets and the checkered floor.
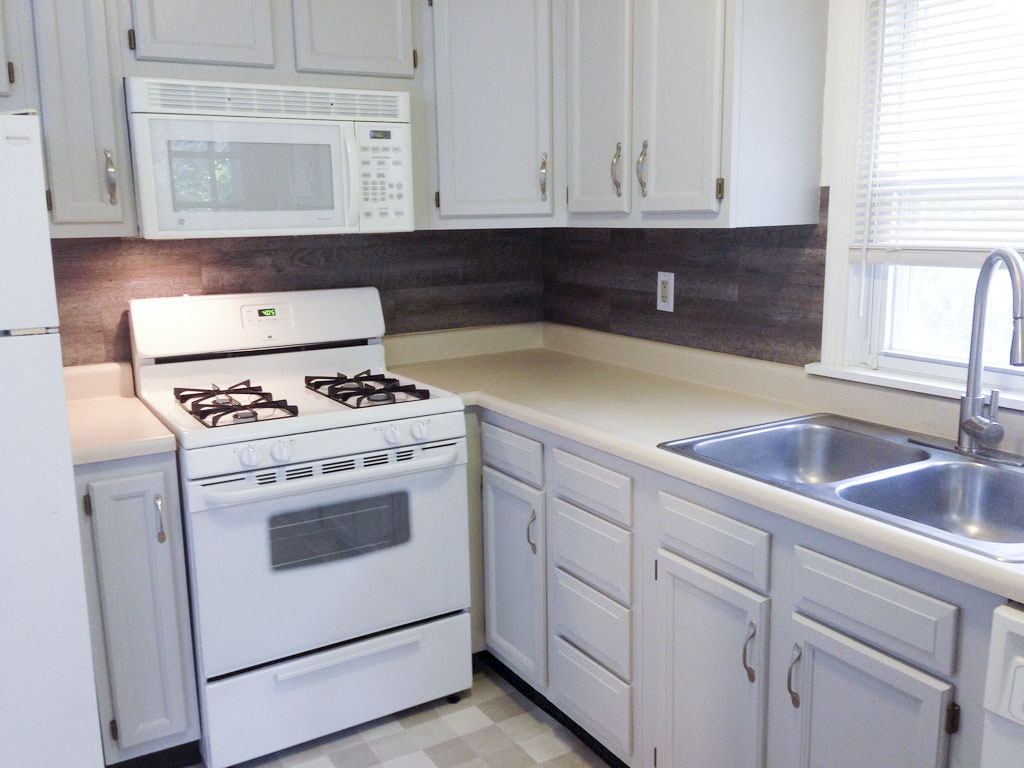
The painted cabinets with the new stove and other appliances, all ready for a renter.
Update: These cabinets were a hit with everyone who looked at the apartment and we were able to rent our little place quickly. If you want to see more of the finished product, check out this house tour of our rental property.
-
 Must Watch TV: The Great Interior Design Challenge on Netflix
Mixing British Architecture with Experimental Design
Must Watch TV: The Great Interior Design Challenge on Netflix
Mixing British Architecture with Experimental Design -
 Installing Subway Tile in Our Victorian Bathroom
Classic White Subway Tile on All the Walls
Installing Subway Tile in Our Victorian Bathroom
Classic White Subway Tile on All the Walls